Showing posts with label nature table. Show all posts

Thursday, February 13, 2014

Borax Bejeweled Bits Of Nature


On my walks I am often drawn to gathering bits of beauty that cross my path and carrying home an arm load (and pockets full!) of natures gifts. My girls have joined in on this pleasure and together we keep our vases, nature table, baskets, jars... (you get the idea ;) full.
The collecting doesn't seem to end in winter. There is still so much beauty peeking out of the snow ~ milkweed, Queen Anne's Lace, berries, branches... a bounty of natures gifts!
Inspired by the borax snowflakes, I thought we might combine our love of nature with our love crystals and see what happens!
  We were truly delighted by the outcome. 
Mother nature being the true artist!


Here's how simple it is.

To create you will need
seed pods, branches, dried grass, berries, pine cones... any bits of nature that call to you
borax 
jars
water

*Borax is a laundry booster and is labeled *all natural* but please use caution when working with children. Have the adult or teacher handle the borax and work in a ventilated room just to be safe*

To begin gather your bits of nature.


Put your water on to boil.
Then place your borax into your jar (3 Tbsp for each cup of water).
Add your boiled (measured) water and stir until dissolved.


Submerse your bits of nature into the jar and let sit. 
The longer you leave them the larger the crystals will grow.
We just kept peeking at ours (every couple hours) until we had the size of crystals we desired.
When they are ready, gently remove them from the water and lay to dry.
Be sure to handle the pieces with care, as the crystals are quite fragile.


We were enchanted with their shimmering crystals.


Each one beautiful in their own way.


I think one of our favorites was this coneflower seed head. The girls were convinced it was now a wand for a very lucky fairy.


Perhaps an acorn hat for the fairy too!


The berries looked as though they had been frost kissed


and the grass sparkled and glittered in the sun.


The crystals hung so delicately on Queen Anne's Lace skeleton.


The milkweed pods were lovely all bejeweled.


With each piece we marveled.


We placed a bouquet of these jewel glazed beauties our table. Just the right bit of glittering magic to brighten these cold winter days. 


We also lay some on our nature table with King and Queen (and baby) winter to keep them company. 
I think we are hooked!

 A very HAPPY VALENTINES to one and all. May your day over flow with all things LOVE!


Shanti

Tuesday, November 23, 2010

*** Queen Winter ***


With winter solstice less than a month away, I decided to craft up a Fairy Winter Queen to spread her sparkle over our winter nature table!


To create these you will need
a wooden doll pin
white pipe cleaner
white felt
white roving
white tule
a white flower
an acorn top
a feather
a doll pin stand
a glue gun
and of course ~ some sparkle if you like!


To begin wrap your pipe cleaner around the body (twisting it once in the back to hold better) and trim your arms to the length you desire.


Cut out a rectangle (double the length of the body) out of your felt and fold in half.
Draw what ever shape you would like for your dress and cut out. Remember to leave the top folded and mostly uncut. 
Cut a small hole for the head.

With your glue gun ~ glue down the sides and the sleeve bottoms.


Draw a shape for your skirt and cut out. Next cut a small hole in the center...


and slide the body in.


The tule part is tricky (I ended up burning my fingers a couple times) basically you put some glue under the skirt at the top, gather your tule in folds and press down into the glue ~ trick I finally figured out ~ use something other than your fingers to push the tule into the glue ~ ouch!


Cut the petals off your flower and glue them in twos onto the back of your fairy.


Glue on your roving for hair and then your acorn top hat.


Then cut your feather to fit around the waist and glue it together in the back.


There she is!

King winter (is now done!) is in the works.... will share him soon too.

Also wanted to mention... these little dolls your kids can actually play with (unlike many of my other fae inspired creatures). She turned out quite sturdy and ready for little hands.


Hard to believe the snow will soon fly and leave us living blanketed in a sparkling white. I think I actually am looking forward to that after all the grey, colorless days we have been having ~ or
perhaps Queen Winter and thawed my resistance to the snowy season ; )

May Queen Winter spread her sparkle on you

~ Shanti ~

Wednesday, October 6, 2010

Luminous Leaf Lanterns


Making this lantern was a bit of an experiment. I wasn't quite sure if it would work but when I imagined the glow of a candle through a kaleidoscope of fall leaves...I just had to try it!


If you want to create these too, it is so SIMPLE!
First  collect some vibrant leaves (we gathered from the sumac tree ~ glowing red right now in our backyard) and press them.


Gather up your supplies
leaves pressed (at least 36 hours)
mod podge ~ love this stuff!
paint brush
glass jar or bowl (I found this bowl at salvation army and thought...hmmm...lantern?!) 


To begin, paint a thick layer of mod podge onto your glass surface. Place your leaves on top.


Paint thickly over the leaves. Don't worry if they don't lie flat in all places, the leaves seem  to hold strong once the mod podge dries.


Let dry and Voila!


This lantern has now made its home on our nature table...glowing brightly...illuminating the the gnomes, acorns, felt pumpkins, leaves and all our autumn treasures!


Autumn Love and Light to you all
~ Shanti ~

Thursday, August 5, 2010

Toadstool people!!!


If you've been following our antics here at Twig and Toadstool, you'll know that we just LOVE toadstools!  
These little people were inspired by a book of Ruby's called "Children of the Forest" by Elsa Beskow.  There are these sweet little children, and their mother, working in the forest,  all decked out in toadstool caps.  So, I decided to try to make my own version of little Toadstool people!

I had wooden peg dolls in various sizes, so I made a mama and 2 children.  I'm going to make a father, with a long white beard to go with this precious little family!  If you want to make your own, I would start by going to Wee Folk Art and print out her basic gnome pattern.  It's a great starting point to making gnomes of your own.  To make the Toadstool hats, you just trace 2 circles, (one in red & one in white), you choose the size.  Cut a little hole in the middle of your white circle, (for your peg head to fit through), sew them together, stuff loosely and glue onto the head!  Then glue on the little spots.

Here's a close up of the mama!


I can't wait to see what adventures awaits our little Toadstool people!  They were just discovered by a very excited Ruby this morning!!!

xo maureen

Sunday, July 11, 2010

It's Beach Week!! Let's Make a Magical Mermaid Wand!!!


So here's a super simple beach craft to make this summer!

Firstly, gather up your supplies...you'll need:
thin pieces of drift wood
shells...a good assortment
beach glass
beads
ribbon or twine
wire, (I like plastic coated myself, super easy to work with)
a glue gun and glue sticks
scissors
whatever else you fancy!


Keep in mind that you can modify the list of supplies...the essential part is the driftwood stick and shells...other than that...it's really up to you...use whatever you have on hand!


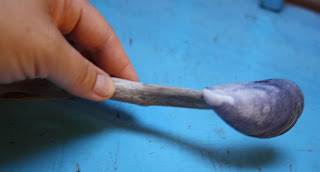
We began by using our glue gun and gluing the shell we chose onto the top of our piece of driftwood!

Then wrap your ribbon around near the top of the stick.  On mind I left the bottom half of the stick bare, so you could see the driftwood...


Ruby did hers a bit different!  The end result will be splendid no matter what you do! 


Then we used the wire and wrapped bits of beach glass, shells and threaded on beads...


Here's a close up of my wand...I also used some twine to hang the beach glass and shell off of the wand!
I think the fun thing with this craft is that there are just no rules...put out your supplies, and let your imagination lead you! 


"O Golden mermaid appear to me
Spirit of foam, rise from the sea.
The hour of the full moon tide draws near,
Hear the words, draw near and appear!"
-Niabi Ruiz


We spent our evening watching the sun set at our favourite swimming spot, just Ruby and I.  Ruby brought the wands and shook them over the water...it was magical to watch her so caught up in her imaginings!

What a super craft this would be while you're on vacation near the water, or for a mermaid themed birthday party! I think our wands are going to hang out on our nature table for some of the summer...as a reminder of the creative and special summer night we had together!

In mermaid magic
Maureen xo

ShareThis

LinkWithin

Related Posts with Thumbnails